

使用Python实现多网络端口转发的程序
发布: 更新时间:2024-12-01 09:51:08
本文介绍了如何使用Python语言编写一个端口转发的程序,实现多网络之间的信息通信。该程序能够在一台主机上实现不同网络之间的数据传输,前提是这些网络都有可以连通的端口。
最近,我发现使用的科学网络工具不太好用了,于是向博士同学请教,他给了我一个更好用的工具。这个工具支持本机上网,并且效果非常好,但它只能支持本机上网,无法支持局域网中其他主机的请求。这就导致了一些问题,比如我在工作站上使用GitHub、huggingface等应用,而工作站是运行Linux系统的,而这个工具只能运行在Windows系统上,并且只能接收localhost的端口转发,无法支持局域网中其他主机的请求。因此,我决定编写一个程序来填补这个空白。
最初我考虑手动编写代码,但觉得耗时较长,而且个人使用,不需要进行代码优化或性能追求。于是我决定使用ChatGPT来自动生成代码。以下是自动生成的端口转发代码:
import socket
import threading

# 转发函数
def forward(source, destination):
    while True:
        try:
            data = source.recv(4096)
            if not data:
                break
            destination.sendall(data)
        except Exception as e:
            print(f"Connection error: {e}")
            break

# 处理单个客户端连接
def handle_client(client_socket, target_host, target_port):
    try:
        # 连接到目标地址
        target_socket = socket.socket(socket.AF_INET, socket.SOCK_STREAM)
        target_socket.connect((target_host, target_port))

        # 创建两个线程:分别转发客户端到目标和目标到客户端的数据
        threading.Thread(target=forward, args=(client_socket, target_socket)).start()
        threading.Thread(target=forward, args=(target_socket, client_socket)).start()
    except Exception as e:
        print(f"Error handling client: {e}")
        client_socket.close()

# 主端口转发逻辑
def start_port_forwarding(local_host, local_port, target_host, target_port):
    server = socket.socket(socket.AF_INET, socket.SOCK_STREAM)
    server.bind((local_host, local_port))
    server.listen(15)
    print(f"[*] Listening on {local_host}:{local_port} and forwarding to {target_host}:{target_port}")

    while True:
        client_socket, addr = server.accept()
        print(f"[*] Accepted connection from {addr}")
        threading.Thread(target=handle_client, args=(client_socket, target_host, target_port)).start()

if __name__ == "__main__":
    # 配置端口转发信息
    LOCAL_HOST = "0.0.0.0"  # 本地监听地址
    LOCAL_PORT = 8888       # 本地监听端口
    TARGET_HOST = "127.0.0.1"  # 目标地址(替换为实际地址)
    TARGET_PORT = 33210           # 目标端口

    # 启动端口转发
    start_port_forwarding(LOCAL_HOST, LOCAL_PORT, TARGET_HOST, TARGET_PORT)
ChatGPT自动生成的端口转发代码非常好用,让我可以在个人手机上观看YouTube。
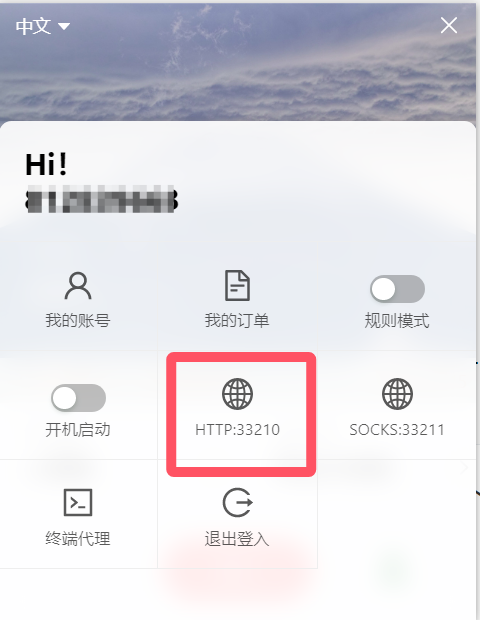
需要注意的是端口的设置。在下图中,工具的本地接受的端口号为HTTP下的33210,因此在代码中需要将TARGET_PORT设置为33210。由于是本地的端口转发,本地IP设置为127.0.0.1,而这个代码实现的是对局域网中的请求的接收并转发给TARGET_PORT,因此LOCAL_HOST需要设置为0.0.0.0,这样就可以接收局域网中的请求。如果设置为“127.0.0.1”,则无法实现对局域网中请求的接收。LOCAL_PORT的设置相对比较随意,这个端口号是暴露给局域中的其他主机进行网络设置时使用的。
其他主机上(局域网中其他主机)的网络设置如下:
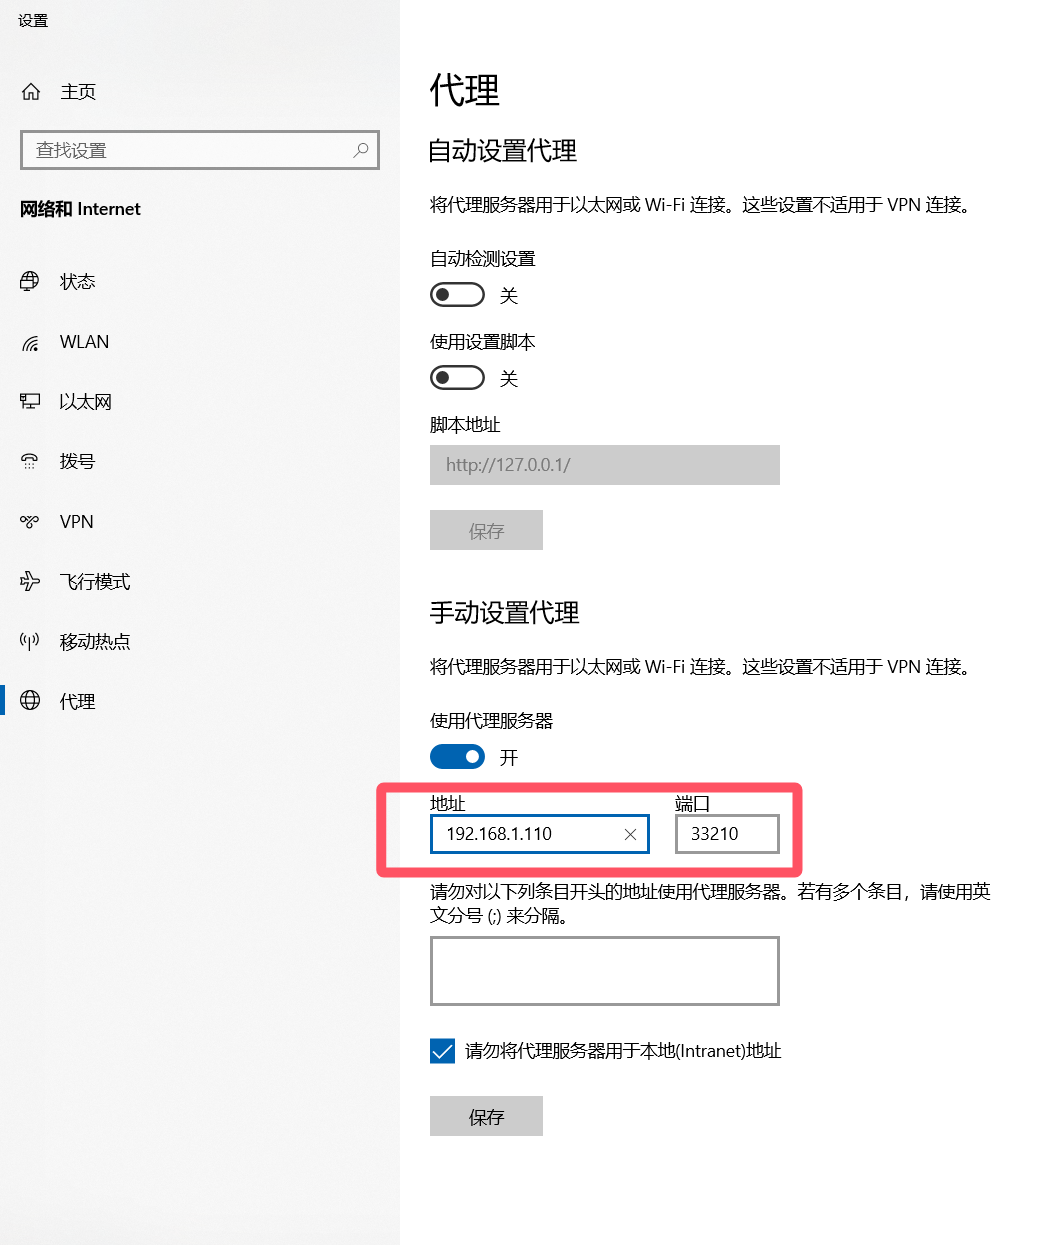
这里的IP:192.168.1.110,就是运行这个代码和这个science network的工具的Windows主机的IP地址。
个人github博客地址:
https://devilmaycry812839668.github.io/
- 黑暗套装技能攻略(黑暗套装技能搭配+装备选择,提升战斗实力) 2025-04-28
- 《全面解析手游皇子最新玩法攻略》(掌握皇子的奥义,称霸战场!) 2025-04-27
- 热血江湖技能详细攻略(解密热血江湖中的绝世武功与无敌技能,助你成为无敌武侠大师) 2025-04-27
- 龙族幻想美女技能搭配攻略(打造最强龙族美女战队,让技能相得益彰) 2025-04-26
- 传奇4射手技能挂机攻略(掌握射手技能的关键,打造超强角色) 2025-04-26
- 掌握梦幻科举生活技能攻略(让你在梦幻科举中游刃有余的关键技巧) 2025-04-25
- 游戏平民屠夫出装攻略视频(学习游戏平民屠夫出装攻略,轻松击败对手,提升游戏实力!) 2025-04-11
- 《以石王技能培养攻略教学》(探索技能培养的奥秘,以石王为例) 2025-04-10